วิทยาลัยการอาชีพสตึก อำเภอสตึก จังหวัดบุรีรัมย์ 31150

"ความรู้ดี ฝีมือเด่น เน้นคุณธรรม ก้าวล้ำเทคโนโลยี"

free hit counters 

ยินดีต้อนรับเข้าสู่บทเรียนออนไลน์ 

4.การติดตั้งระบบปฏิบัติการ Windows 7


    Windows 7 เป็นระบบปฏิบัติการที่มีหน้าที่ดูแลระบบคอมพิวเตอร์ให้ทำงานประสานกันเท่านั้น

หากต้องการทำงานใดๆ เช่น พิมพ์เอกสาร ฟังเพลง หรือเล่นเกมส์

ผู้ใช้จะต้องเรียกใช้โปรแกรมที่ต้องการผ่านทาง Windows 7
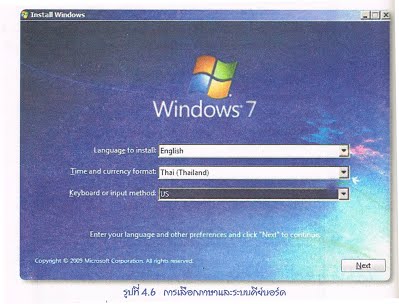
    1.เมื่อบูตแผ่นวินโดส์เสร็จเรียบร้อยแล้ว จะปรากฏหน้าต่างสำหรับเริ่มต้นการติดตั้ง Windows 7 จะปรากฏภาพด้านล่าง ในส่วนนี้สามารถกด Next ได้เลย
คำอธิบาย: https://sites.google.com/a/bicec.ac.th/e-learning/_/rsrc/1463238391620/hnwy-thi-4-kar-tid-tang-laea-kar-thxdthxn-porkaerm-hna-2/4.6.jpg?height=304&width=400
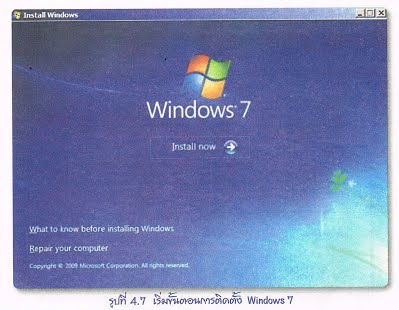
    2.จะเข้าสู่หน้าต่างที่ปรากฏตราสัญลักษณ์หรือโลโก้ Windows 7 ใต้โลโก้จะมีข้อความว่า

Install Now ให้คลิกปุ่มInstall Nowโลโก้ (Logo)

คือสัญลักษณ์ที่แสดงถึงภาพสัญลักษณ์และเครื่องหมายต่างๆ ได้แก่ สินค้าและบริษัทผู้ผลิต
คำอธิบาย: https://sites.google.com/a/bicec.ac.th/e-learning/_/rsrc/1463238482848/hnwy-thi-4-kar-tid-tang-laea-kar-thxdthxn-porkaerm-hna-2/4.7.jpg?height=310&width=400
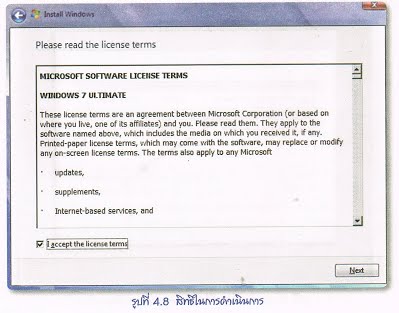
    3.อ่าน License (สิทธิการดำเนินการ) ของโปรแกรม แล้วกดคลิก l accept the license terms

แล้วคลิกปุ่ม Next
คำอธิบาย: https://sites.google.com/a/bicec.ac.th/e-learning/_/rsrc/1463238548929/hnwy-thi-4-kar-tid-tang-laea-kar-thxdthxn-porkaerm-hna-2/4.8.jpg?height=313&width=400
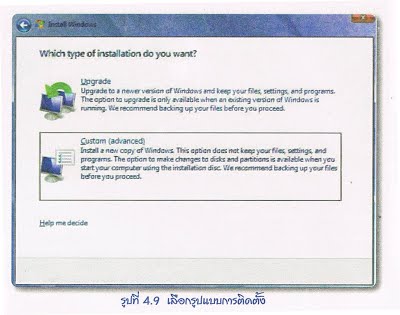
  4.คลิกเลือกที่หัวข้อ Custom (advanced)
คำอธิบาย: https://sites.google.com/a/bicec.ac.th/e-learning/_/rsrc/1463238584568/hnwy-thi-4-kar-tid-tang-laea-kar-thxdthxn-porkaerm-hna-2/4.9.jpg?height=315&width=400
    5.จะปรากฏไดรฟ์ต่างๆ ของฮาร์ดดิสก์ จะเข้าสู่การฟอร์แมตเพื่อลบข้อมูลของวินโดวส์ทิ้งไป โดยเลือกที่ Drive option (advanced)
คำอธิบาย: https://sites.google.com/a/bicec.ac.th/e-learning/_/rsrc/1463238625493/hnwy-thi-4-kar-tid-tang-laea-kar-thxdthxn-porkaerm-hna-2/4.10.jpg?height=316&width=400
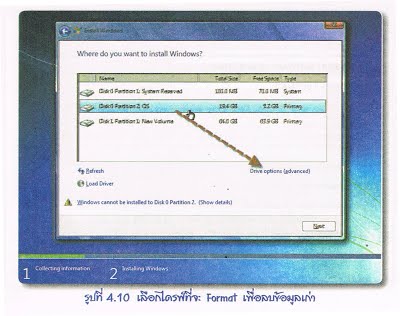
    6.จะปรากฏเมนูDelete,Format,new และ Extend เพิ่มขึ้นมา ให้คลิกเลือกไดรฟ์ C จากนั้นคลิก

ที่ไอคอน
คำอธิบาย: https://sites.google.com/a/bicec.ac.th/e-learning/_/rsrc/1463238668759/hnwy-thi-4-kar-tid-tang-laea-kar-thxdthxn-porkaerm-hna-2/4.11.jpg?height=317&width=400
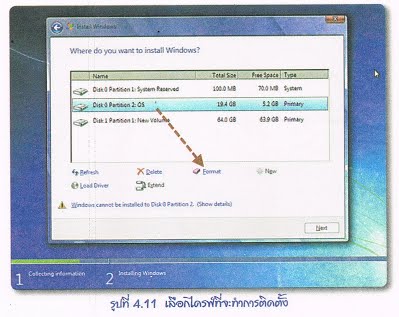
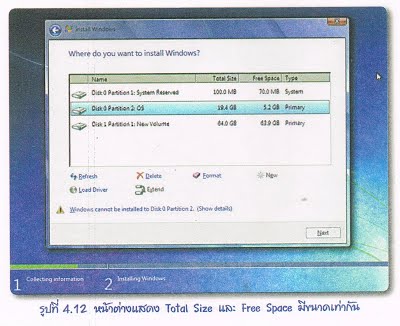
    7.ไดรฟ์ที่เลือกแล้วจะปรากฏ Free Space ขึ้นมาพอๆกับ Total Space แสดงว่าข้อมูลถูกลบไปเรียบร้อยแล้ว ให้คลิกที่ฮาร์ดดิสก์ Partition แล้วคลิก Next
คำอธิบาย: https://sites.google.com/a/bicec.ac.th/e-learning/_/rsrc/1463238684951/hnwy-thi-4-kar-tid-tang-laea-kar-thxdthxn-porkaerm-hna-2/4.12.jpg?height=326&width=400
    8.ระบบจำทำการติดตั้ง Windows 7 ให้ทันที
คำอธิบาย: https://sites.google.com/a/bicec.ac.th/e-learning/_/rsrc/1463238697456/hnwy-thi-4-kar-tid-tang-laea-kar-thxdthxn-porkaerm-hna-2/4.13.jpg?height=313&width=400
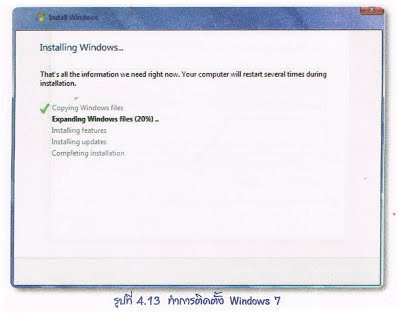
    9.เมื่อระบบทำการติดตั้งเสร็จเรียบร้อย จะทำการรีสตาร์ต (Restart) เครื่องเอง 1 ครั้ง
คำอธิบาย: https://sites.google.com/a/bicec.ac.th/e-learning/_/rsrc/1463238715102/hnwy-thi-4-kar-tid-tang-laea-kar-thxdthxn-porkaerm-hna-2/4.14.jpg?height=321&width=400

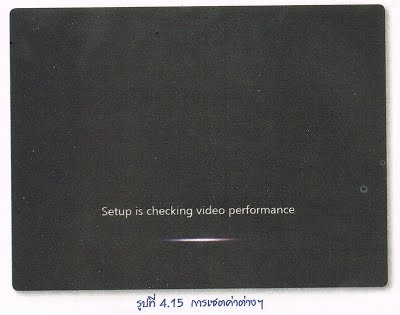
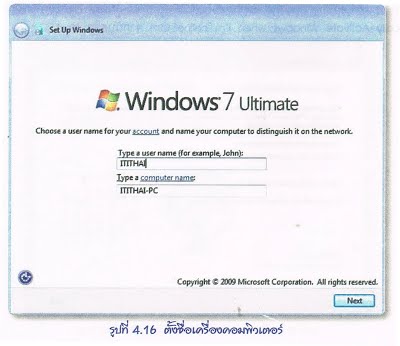
    10.จะเข้าสู่โหมดการเซตค่าต่างๆของเครื่อง
คำอธิบาย: https://sites.google.com/a/bicec.ac.th/e-learning/_/rsrc/1463238731326/hnwy-thi-4-kar-tid-tang-laea-kar-thxdthxn-porkaerm-hna-2/4.15.jpg?height=315&width=400
คำอธิบาย: https://sites.google.com/a/bicec.ac.th/e-learning/_/rsrc/1463238894210/hnwy-thi-4-kar-tid-tang-laea-kar-thxdthxn-porkaerm-hna-2/4.16.jpg?height=346&width=400
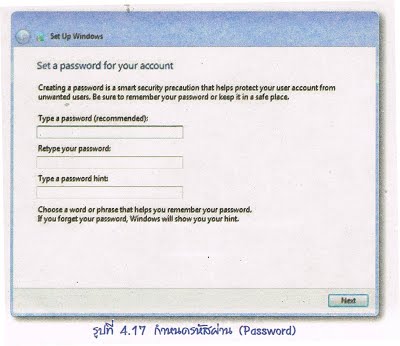
 12.จะเข้าสู่หน้าต่างการกำหนดรหัสผ่าน หรือ Password ก่อนเข้าสู่ Windows ถ้าไม่ต้องการกำหนดรหัสผ่าน สามารถกดNext ผ่านไปได้
คำอธิบาย: https://sites.google.com/a/bicec.ac.th/e-learning/_/rsrc/1463239378316/hnwy-thi-4-kar-tid-tang-laea-kar-thxdthxn-porkaerm-hna-2/4.17.jpg?height=346&width=400
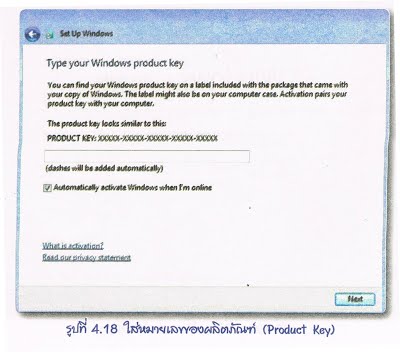
    13.ระบบจะถาม Product Key (รหัสของผลิตภัณฑ์) ของตัววินโดวส์ ผู้ใช้สามารถหา Product Keyได้จากกล่องของแผ่นWindows 7 ที่ซื้อมา หากยังไม่ต้องการกรอกในขณะนี้ ให้คลิกที่

Automaticay Activate Windows when I’m onlineออก จากนั้นคลิก Next
คำอธิบาย: https://sites.google.com/a/bicec.ac.th/e-learning/_/rsrc/1463239415902/hnwy-thi-4-kar-tid-tang-laea-kar-thxdthxn-porkaerm-hna-2/4.18.jpg?height=352&width=400
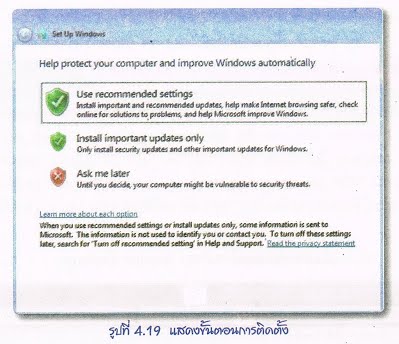
    14.คลิกเลือก Ask me later
คำอธิบาย: https://sites.google.com/a/bicec.ac.th/e-learning/_/rsrc/1463239565892/hnwy-thi-4-kar-tid-tang-laea-kar-thxdthxn-porkaerm-hna-2/4.19.jpg?height=344&width=400
    15.จะเข้าสู่หน้าต่างการตั้งเวลา Time zone ให้คลิกเลือกเขตเวลาของกรุงเทพฯ คือ

(UTC +07.00) Bangkok ฮานอย(Hanoi) จาการ์ตา (Jakarta) แล้วคลิก Next
คำอธิบาย: https://sites.google.com/a/bicec.ac.th/e-learning/_/rsrc/1463239617593/hnwy-thi-4-kar-tid-tang-laea-kar-thxdthxn-porkaerm-hna-2/4.20.jpg?height=346&width=400
    16.เสร็จสิ้นการลง Windows 7 ระบบจะทำการโหลดเข้าสู่หน้าจอวินโดวส์

ถัดไป

ยินดีต้อนรับเข้าสู่บทเรียนออนไลน์